Index Pages Displaying Multiple Model Objects
In this demonstration, I will show how to create an “index” page for displaying a listing of multiple model objects retrieved from the database.
General Steps
In general, the steps for creating an index page are as follows.
-
Step 1 Add an Index Route. This step specifies the URL resource path for the index page and tells the web server which controller action to call to process requests for the index page.
-
Step 2 Create a Model Controller (if Needed). If a controller class does not already exist for the model objects to be displayed, this step creates one.
-
Step 3 Create an Index Controller Action. This step adds an action to the controller that retrieves the model objects to be displayed from the database and renders the HTML.ERB view template for the index page.
-
Step 4 Create an Index View Template. This step adds an index view template that iterates through each of the retrieved model objects, writing data from each object to the view.
Creating an Index Page for a To-Do Items Model
To demonstrate the steps for creating an index page, we will be creating one for a model class representing items in a to-do list. Figure 1 illustrates how the index page will look.
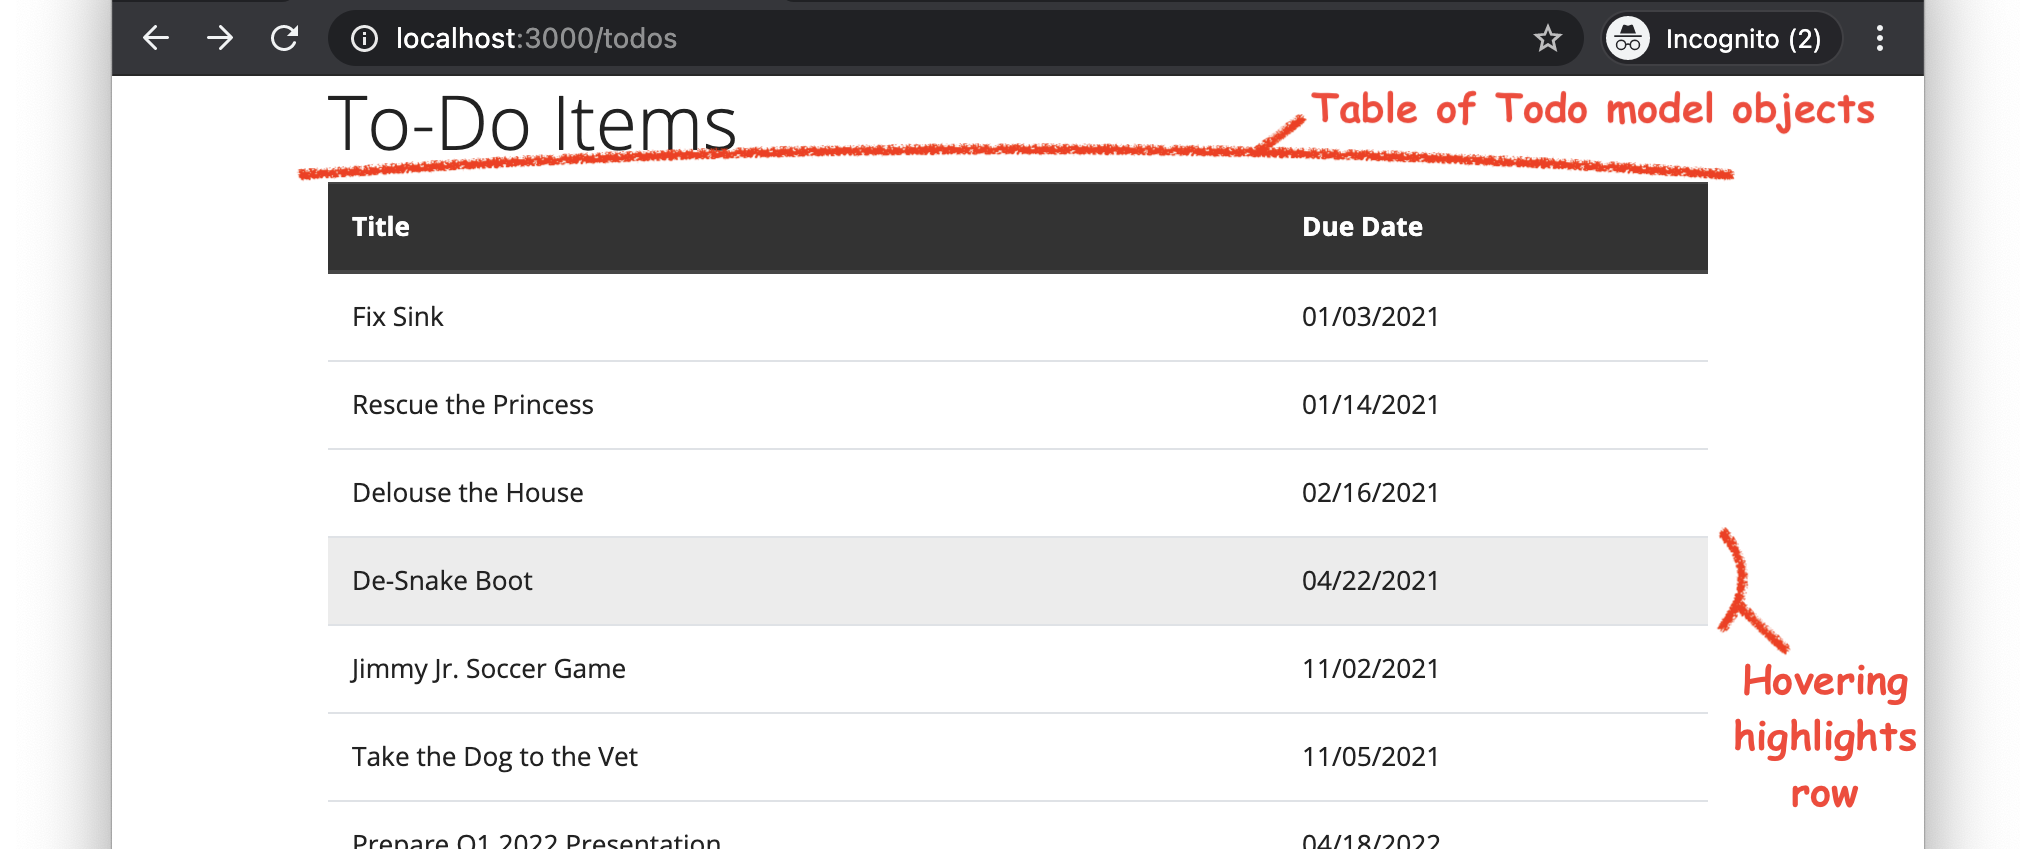
Figure 1. An index page listing the items on a to-do list.
To implement this index page, we will add to the todo base app that contains a Todo model class (depicted in Figure 2) and a seeds script for populating the database with some sample Todo objects (but no routes, controllers, or views).

Figure 2. The Todo model class.
Note that, although the Todo model class has a description attribute for describing a to-do item in detail, we opt not to display the descriptions on the index page, as it is meant to present only a brief summary of the to-dos. The full data for each model object, including the description, will be displayed in the upcoming show pages demo.
Step 1 Add an Index Route
To add a route for the index page, we add a route declaration to the config/routes.rb file, like this:
Rails.application.routes.draw do

  get 'todos', to: 'todos#index', as: 'todos'

end
Note that this route adheres to the following Rails resourceful-style naming conventions. The URL resource-path pattern, the controller name, and the path/URL helper prefix are all named like the model database table—that is, the model name in snake_case and pluralized (i.e., todos). Don’t forget that the name for the controller specified in the route (todos) is a shorthand for the actual controller class name (TodosController). The name of the controller action method is index.
Test It!
To confirm that we made this change correctly, we run the following command in the terminal:
rails routes -E
The command should output a long list of routes, but the very first one is the only one we care about. If we coded our route correctly, it should look like this:
--[ Route 1 ]-------------------------------------------------------------------------------------------------------------------
Prefix            | todos
Verb              | GET
URI               | /todos(.:format)
Controller#Action | todos#index
If we made an error, something different will be outputted. For example, if we made a syntax error, it would instead produce an error message.
Step 2 Create a Model Controller (if Needed)
To create a controller for the Todo model objects, we run the rails generate command, like this:
rails generate controller Todos
This command should produce the following output:
Running via Spring preloader in process 90520
      create  app/controllers/todos_controller.rb
      invoke  erb
      create    app/views/todos
      invoke  test_unit
      create    test/controllers/todos_controller_test.rb
      invoke  helper
      create    app/helpers/todos_helper.rb
      invoke    test_unit
      invoke  assets
      invoke    scss
      create      app/assets/stylesheets/todos.scss
Note that, among other things, the command creates a TodosController controller class (in app/controllers/todos_controller.rb) and a folder for view templates used by the controller (app/views/todos/).
Test It!
Although there’s no good way to test this step per se, we can verify that we generated the code correctly by carefully inspecting the output of the command. In particular, look closely at the first create line:
create app/controllers/todos_controller.rb
The name of the controller file generated should exactly match todos_controller.rb. If there is any difference in spelling, capitalization, or punctuation, then an error was made.
Step 3 Create an Index Controller Action
To create the controller action for the index page, we perform two substeps: first, we create the controller action code for rendering the view, and then, we add the code for retrieving the model objects that will be displayed in the view.
Substep
Create an index controller action that renders the appropriate view. To complete this substep, we define an index method in the TodosController class (in app/controllers/todos_controller.rb), like this:
class TodosController < ApplicationController

  def index
    render :index
  end

end
Note that, so far, the index controller action only renders the view template app/views/todos/index.html.erb (as specified by the :index symbol).
Substep
Make the controller action retrieve the model objects to be displayed in the view. As a first attempt at completing this substep, we add a call to the Todo.all model class method to the index method of the TodosController class, like this:
class TodosController < ApplicationController

  def index
    @todos = Todo.all
    render :index
  end

end
Note that the call to Todo.all returns an array of Todo objects (i.e., the ones retrieved from the database), and the @todos instance variable is assigned a reference to that array. The use of an instance variable (indicated by the @ in @todos) is important here, because instance variables are accessible within view templates rendered by the class, thus allowing data to be passed from the controller to the view.
Using the all model class method, as shown above, is the most common way to retrieve all the objects from a model’s database; however, in this particular to-do list example, it creates a problem. The all method returns the objects sorted by their time of creation, but that order doesn’t make sense for a to-do list. Rather, it would be better to sort the objects based on when they are due, with to-do items that are due sooner coming before those that are due later.
To fix this problem by retrieving the Todo objects sorted in ascending order by their due_date attribute, we change the call to all to a call to the order model class method, like this:
class TodosController < ApplicationController

  def index
    @todos = Todo.order(:due_date)
    render :index
  end

end
This call to order retrieves all the Todo model objects sorted in ascending order by the due_date attribute (as specified by the :due_date symbol passed to the call).
Test It!
To at least partially confirm that we made this change correctly, we run the web app (as per the steps in the running apps demo), and we open the URL http://localhost:3000/todos in our web browser. An error page should be displayed with the message “Template is missing”, because we have not yet created a view template for the index page. If a different error message appears (e.g., a syntax error), then we made some other mistake, which we would want to fix before proceeding to the next step.
Step 4 Create an Index View Template
To print the retrieved Todo objects in a table (as shown in Figure 1), we first create a view template containing an HTML skeleton for the page, and then, we add logic that iterates through the Todo objects, filling in the page with data for each object.
Substep
Rough in the HTML skeleton. To complete this substep, we create a new view template file in the folder app/views/todos/ named index.html.erb, and we add HTML elements to the file, like this:
<h1>To-Do Items</h1>

<table class="table table-hover">

  <thead class="thead-dark">
    <tr>
      <th>Title</th>
      <th>Due Date</th>
    </tr>
  </thead>

  <tbody>
    <tr>
      <td>TITLE_GOES_HERE</td>
      <td>DUE_DATE_GOES_HERE</td>
    </tr>
  </tbody>

</table>
To create this table, we followed the general steps in the tables demo; however, we styled the table a bit differently this time. We applied the Bootstrap CSS class table-hover to the <table> element, so that hovering the mouse pointer over a table-body row will cause the row to become highlighted. Also, note that, for now, the body of the table has only one row with “X_GOES_HERE” placeholder text in each cell.
Substep
Iterate through the retrieved model objects, printing a placeholder row for each. To begin processing the retrieved Todo model objects, we surround the table body’s <tr> element with a call to the each method for iterating through an array, like this:
<table class="table table-hover">

  <thead class="thead-dark">
    …
  </thead>

  <tbody>
    <% @todos.each do |todo| %>
      <tr>
        <td>TITLE_GOES_HERE</td>
        <td>DUE_DATE_GOES_HERE</td>
      </tr>
    <% end %>
  </tbody>

</table>
As a result of this change, the table body will now display 10 rows, one for each Todo object retrieved from the database. However, the cells in each row will still contain only “X_GOES_HERE” placeholder values.
Substep
Fill in each row with the data for the current model object. To fill in cells for each row with the data of the corresponding Todo object, we replace the “X_GOES_HERE” placeholder values with embedded Ruby calls to the appropriate Todo attribute accessor methods, like this:
<table class="table table-hover">

  <thead class="thead-dark">
    …
  </thead>

  <tbody>
    <% @todos.each do |todo| %>
      <tr>
        <td><%= todo.title %></td>
        <td><%= todo.due_date.strftime("%m/%d/%Y") %></td>
      </tr>
    <% end %>
  </tbody>

</table>
In the above code, the todo variable references the current Todo object during each iteration through the array of objects. The calls to title and due_date each return the value of the corresponding attribute for the object. The list of Todo class attributes can be found in the comments at the beginning of the model class file, app/models/todo.rb. Surrounding each call to an attribute accessor method in the embedded Ruby tag <%= … %> (note the =) causes the value returned by the method to be written to the generated HTML. Note that the Date method strftime method was used to format the due_date attribute. Here, we passed strftime the argument "%m/%d/%Y", which will format the date as MM/DD/YYYY (e.g., 02/14/2021).
Test It!
To verify that we performed all parts of this step correctly, we run the web app (as per the steps in the running apps demo), and we open the URL http://localhost:3000/todos in our web browser. The webpage displayed should look exactly like Figure 1.
Conclusion
Following the above steps, we have now added an index page to the to-do list app.