Skills Assignment SA4-EV: Forms and Actions for Managing Model Objects Explanation Video
Getting Started
Before proceeding, be sure to read the general instructions for the explanation videos.
- Access the GitHub organization’s repositories page.
- In your web browser, log into GitHub.
- Navigate to the repositories page of the memphis-comp-7012-2024-08fall GitHub organization.
- Create a new repository from the template.
- Click the New repository button at the top-right of the page.
- Fill out the Create a new repository form as follows:
- Repository template: Select
template-sa4-ev. - Owner: Select
memphis-comp-7012-2024-08fall. - Repository name: Use the form below to generate the name for your repository.
- Select Private, so that only you and your instructors can access your repository.
- Repository template: Select
- Once you have filled out all the fields, click the Create repository button at the bottom right of the page.
- Clone the repository and set up your local environment.
- In your terminal, clone the newly created repository into your workspace folder.
- Set up local repository by following steps similar to those in the Running Apps demo.
- Start the recording.
- You may start your screen recording after you have cloned the repository and are ready to start the task (see the EV general instructions).
sa4-ev-hjsimpson-1
Task
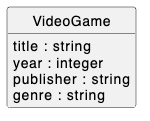
The aim of this project is enable users to make a database of video games. The project already includes a VideoGame model class, as per this class diagram:

In addition to this model class, the project also already includes the following:
- Attribute validations for the
VideoGameclass - Seeds for the
VideoGameclass - A
VideoGamesControllerclass - Routes, actions, and view templates for an index page
- A root route set to redirect to the index page
- The flash-notification infrastructure described in the Flash Notifications deets
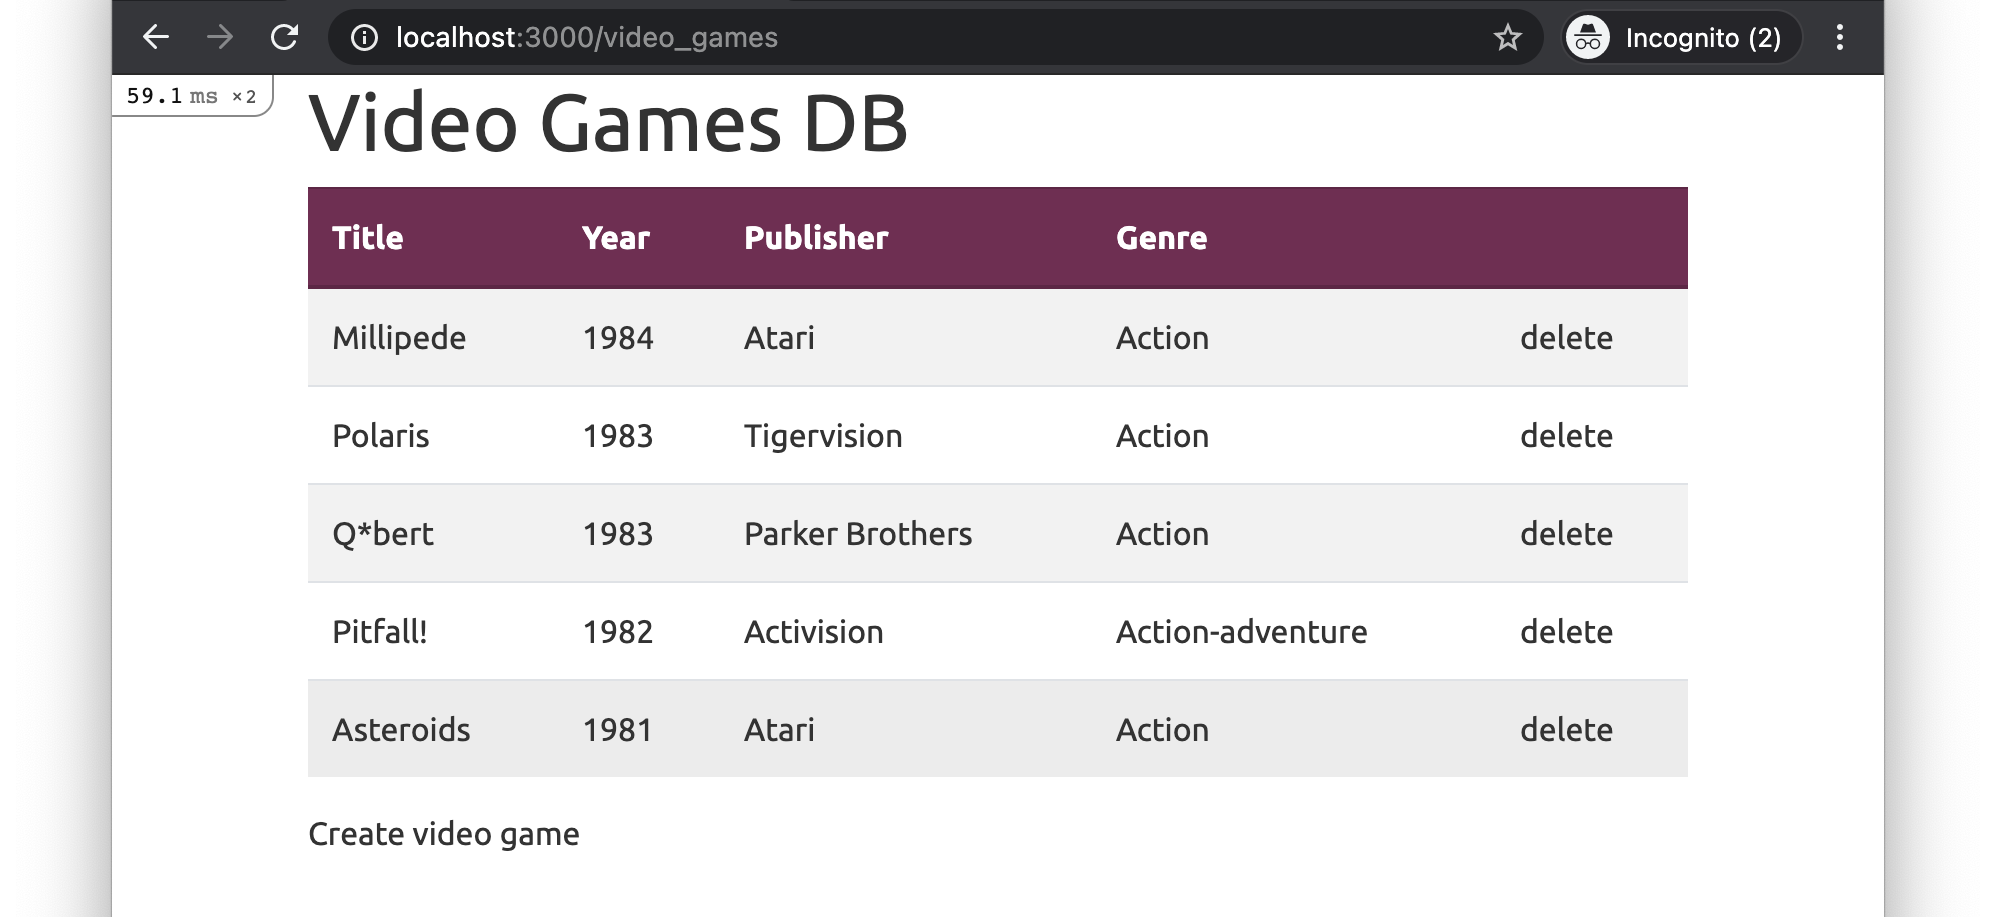
If you initialize and run the app, you will see that the index page looks like this:

The video can begin after you have cloned, initialized, and run the base app.
Task to perform: You must add new/create and destroy functionality for VideoGame objects.
Detailed Specifications
Existing Functionalities
- Feature: Browse Video Games
- As a user,
- I want to see a list of video games
- So that I can choose one to view more details about
- Scenario: Viewing the video game index page content
- Given I have created two sample VideoGame records
- And I am on the /video_games page
- Then I should see an
h1element with text “Video Games DB” - And I should see a table with headers “Title”, “Year”, “Publisher”, “Genre” and one empty header
- And I should see two table body rows with the sample records’ title, year, publisher, genre, and link with text “delete”
- And I should see a link with text “Create video game”
- Scenario: Redirecting from the root page to the video_games page
- When I visit the root URL
- Then I should be automatically redirected to the /video_games page
New Functionalities
- Feature: Create New Video Game
- As a user,
- I want to add a new video game to the database
- So that I can expand my list of video games
- Scenario: Viewing the new video game form page
- Given I am on the /video_games/new page
- Then I should see an
h1element with text “New Video Game” - And I should see a form with fields “Title”, “Year”, “Publisher”, “Genre” and a “Create Video game” button
- Scenario: Creating a new video game with valid details
- Given I am on the /video_games/new page
- When I fill in a title
- And I fill a year that is greater than or equal to 1950
- And I fill in a publisher
- And I fill in a genre from the list
- And I click the “Create VideoGame” button
- Then a VideoGame record with matching attribute values should be created
- And I should be on the /video_games page
- And I should see a success-styled flash message with text “New video game successfully added!”
- And I should see the new video game in the video game list
- Scenario: Creating a new video game with missing title
- Given I am on the /video_games/new page
- When I do not fill in a title
- And I click the “Create VideoGame” button
- Then a VideoGame should not be created
- And I should see a HTML5 validation popup with text “Please fill out this field.”
- Scenario: Creating a new video game with invalid year
- Given I am on the /video_games/new page
- When I fill in an year that is not greater than 1950
- And I click the “Create VideoGame” button
- Then a VideoGame should not be created
- And I should see an error-styled flash message with text “VideoGame creation failed.”
- And I should see the new video game form with error messages indicating the validation failures
- Scenario: Creating a new video game with invalid genre
- Given I am on the /video_games/new page
- When I fill in a genre that does not match the list
- And I click the “Create VideoGame” button
- Then a VideoGame should not be created
- And I should see an error-styled flash message with text “VideoGame creation failed.”
- And I should see the new video game form with error messages indicating the validation failures
- Scenario: Navigating to the new video game page from the index page
- Given I am on the /video_games page
- When I click on the “Create video game” link
- Then I should be on the /video_games/new page
- Scenario: Navigating back to the video game index page from the new page
- Given I am on the /video_games/new page
- When I click on the “Cancel” link
- Then I should be on the /video_games page
- Feature: Destroy Video Game
- As a user,
- I want to delete an existing video game
- So that I can remove it from the database
- Scenario: Deleting a video game from the index page
- Given I am on the /video_games page
- When I click the “delete” link for a video game
- Then the VideoGame record with that id should no longer exist
- And the number of video games should decrease by one
- And I should be on the /video_games page
- And I should see a flash message “VideoGame successfully removed”
- And I should not see the deleted video game in the video game list on the /video_games page
Additional Constraints:
- You must follow the standard Rails conventions:
- Each URL pattern must have a path helper following the standard Rails convention:
/video_gamesisvideo_games_path/video_games/newisnew_video_game_path/video_games/:idisvideo_game_path
get /video_gamesroutes toVideoGamesController#indexpost /video_gamesroutes toVideoGamesController#createget /video_games/newroutes toVideoGamesController#newdelete /video_games/:idroutes toVideoGamesController#destroy
- Each URL pattern must have a path helper following the standard Rails convention:
- Links must use the
link_toorbutton_tohelper where appropriate with the appropriate path helper- The
button_tocan be styled withclass: 'btn btn-link p-0 pb-1 m-0', form: { class: 'd-inline' }to match the other links.
- The
- Forms must use the
bootstrap_form_withhelper - Model class names, attribute names, and attribute types must be as instructed
- 5 seeds must be created as instructed upon seeding
- All HTML tags must be properly closed
- No duplication of
head/style/bodyelements in the rendered HTML
Note: Italicized requirements will be manually confirmed by the graders.
Testing Your Work with RSpec
Each of the feature stories above corresponds to an RSpec feature spec. These tests (and others for the additional constraints) have been provided in the repository to help you check whether your implementation meets the requirements.
Recommended Workflow
- Read through the detailed specifications first. Understand what is required for each page and scenario.
- Approach 1 - for those familiar with Test-Driven Development (TDD):
- Run
rspec spec/featuresto execute the feature tests. - Try to write the minimum amount of code needed to make each test pass.
- Watch the tests fail and pass as you meet each requirement.
- At the end, run all the provided tests with the
rspeccommand to check if everything passes.- Note that not all tests are feature tests, so it is necessary to run
rspecat the end to ensure that all tests are run.
- Note that not all tests are feature tests, so it is necessary to run
- Run
- Approach 2 - for those less experienced with testing:
- Work through the specifications step by step, ensuring your implementation meets each requirement.
- Once you’ve completed your implementation, run all the tests with the
rspeccommand to check if everything passes.
Either of the above approaches is fine, as long as all tests pass by the end.
How to Submit Your Work
Once you’ve completed the task and confirmed that all tests pass:
- Commit your changes:
-
Add all your changes:
git add -A -
Commit your work with a meaningful message:
git commit -m "Completed SA4 Explanation Video"
-
- Push your changes to GitHub:
-
Push your commits to the remote repository:
git push
-
- Submit to Canvas:
- In Canvas, submit:
- The link to your GitHub repository where your code is hosted.
- The link to your video if you are using Teams to record. (If you are not using Teams, then upload the video file.)
- You may submit the links in a single document.
- In Canvas, submit: