New/Create Forms Creating and Saving New Model Objects with Forms
In this demonstration, I will show how to make a “new/create” form for creating new model objects and saving them to the database. The “new” part refers to a new-resource page that displays a form for creating new model objects that users can fill out and submit. When a user submits form data, the browser sends the data in a POST request to the web server. The “create” part refers to a create-resource action that processes those POST requests.
General Steps
In general, the steps for creating a new/create form for an existing model class are as follows. The first several steps are concerned with creating the new-resource page to display the form.
-
Step 1 Add a New-Resource Route. This step specifies the URL resource-paths for the new-resource page and tells the web server which controller action to call to process requests for the new-resource page.
-
Step 2 Add a Model Controller (if Needed). If a controller class for the model objects to be created does not already exist, this step creates one.
-
Step 3 Add a New-Resource Controller Action. This step adds an action to the controller that renders the HTML.ERB view template for the new-resource page.
-
Step 4 Add a New-Resource View Template. This step adds a new-resource view template that displays the form for creating model objects to the view.
-
Step 5 Add Link(s) to the New-Resource Page (if Needed). This step generates links that enable users to access the new-resource page.
The remaining steps are concerned with making the create-resource action for processing form submissions.
-
Step 6 Add a Create-Resource Route. This step specifies that requests resulting from submissions of the new-resource form will be POST requests, specifies the URL resource-paths for such requests, and tells the web server which controller action to call to process such requests.
-
Step 7 Add a Create-Resource Controller Action. This step adds an action to the controller that retrieves the form data sent in the request. The action uses those data to create a new model object and saves that object to the database. If the save is successful, the action sends an HTTP redirect response to a specified page. If the save fails, the action re-renders the new-resource page, so the user can correct the error.
Making a New/Create Form for Todo Model Objects
To demonstrate the steps for creating a new/create form, we will be making a new/create form for a model class representing items in a to-do list. Figure 1 illustrates how the new-resource page will look.
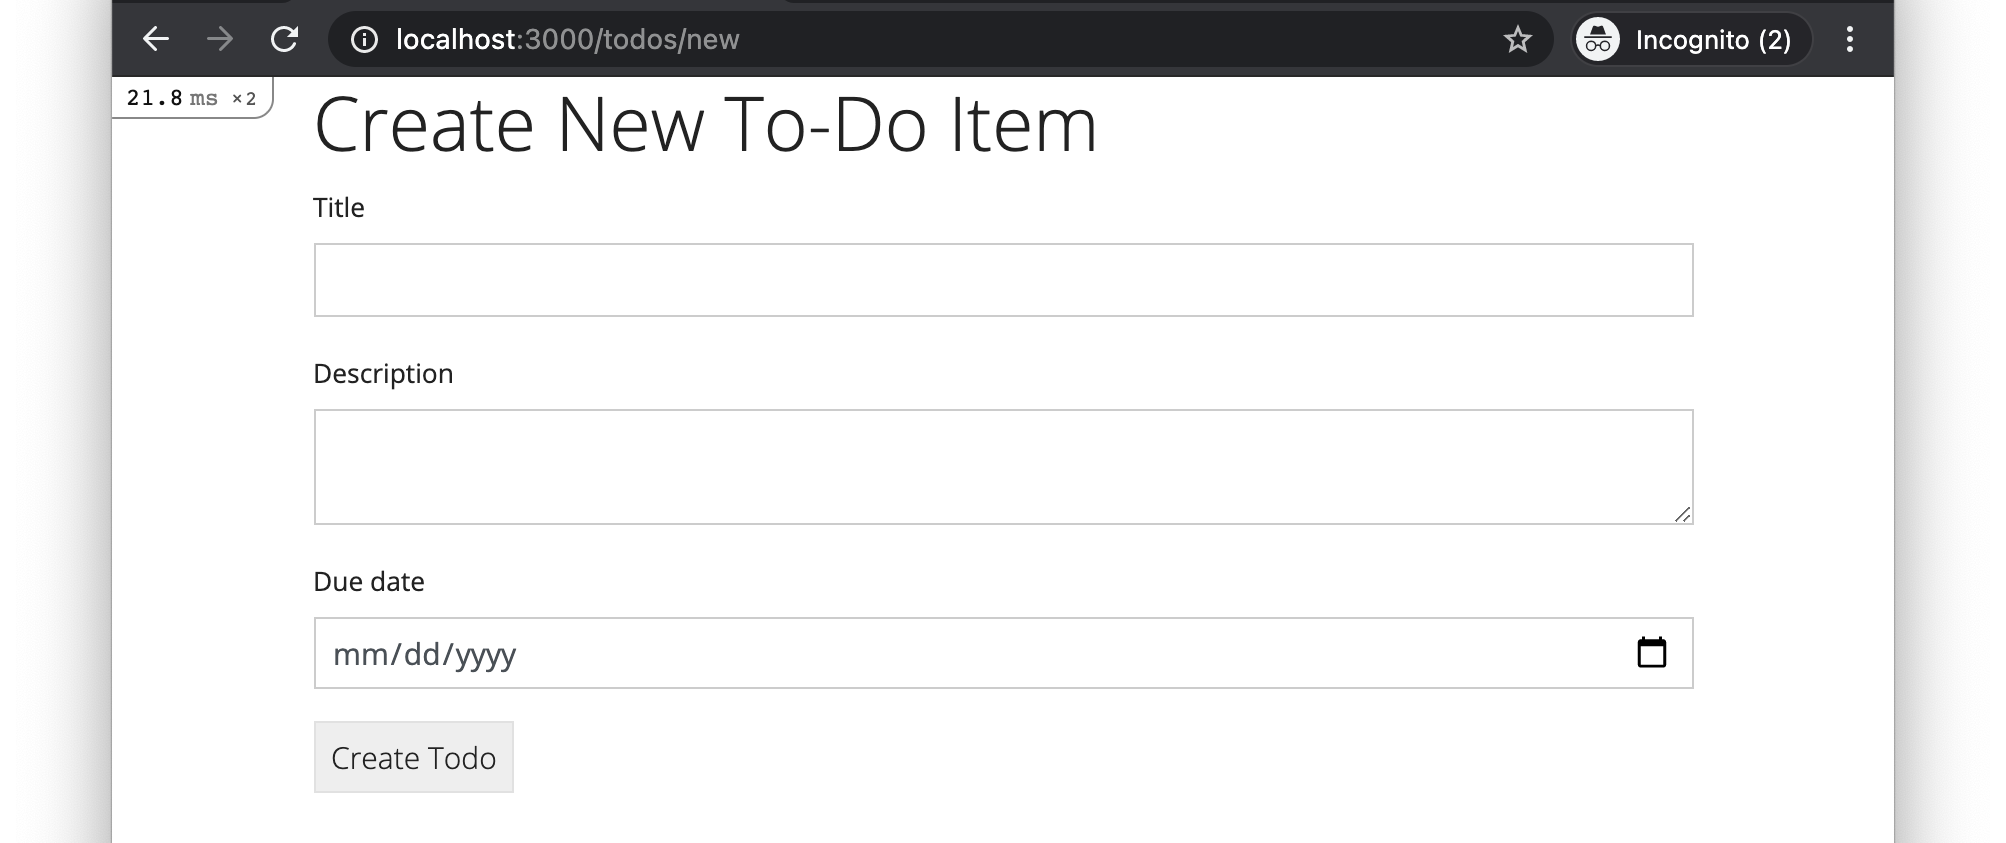
Figure 1. A form for creating a new to-do item.
For this demo, we will build upon a base app (base-app-todo-plus branch) for managing a to-do list that contains a Todo model class (depicted in Figure 2), which includes a couple attribute validations, corresponding model tests, a seeds script for populating the database with some sample Todo objects, a TodosController class, a root route, infrastructure for displaying flash notifications (as described in the flash notifications deets), and the routes, controller actions, and view templates for displaying an index page and a show page for Todo objects.

Figure 2. The Todo model class.
In addition to the new-resource page itself, we will add to the app’s index page a link to the new-resource page, as illustrated in Figure 3.

Figure 3. A button at the bottom of the app’s index page that links to the new-resource page.
After a user successfully submits the form, the browser will be redirected to the app’s index page, and a success notification will be displayed, as illustrated in Figure 4.

Figure 4. A success notification that is displayed after a successful submission of the form.
However, if the user submits invalid data, the form will be redisplayed, with an failure notification and error-message annotations on the invalid form fields, as illustrated in Figure 5.
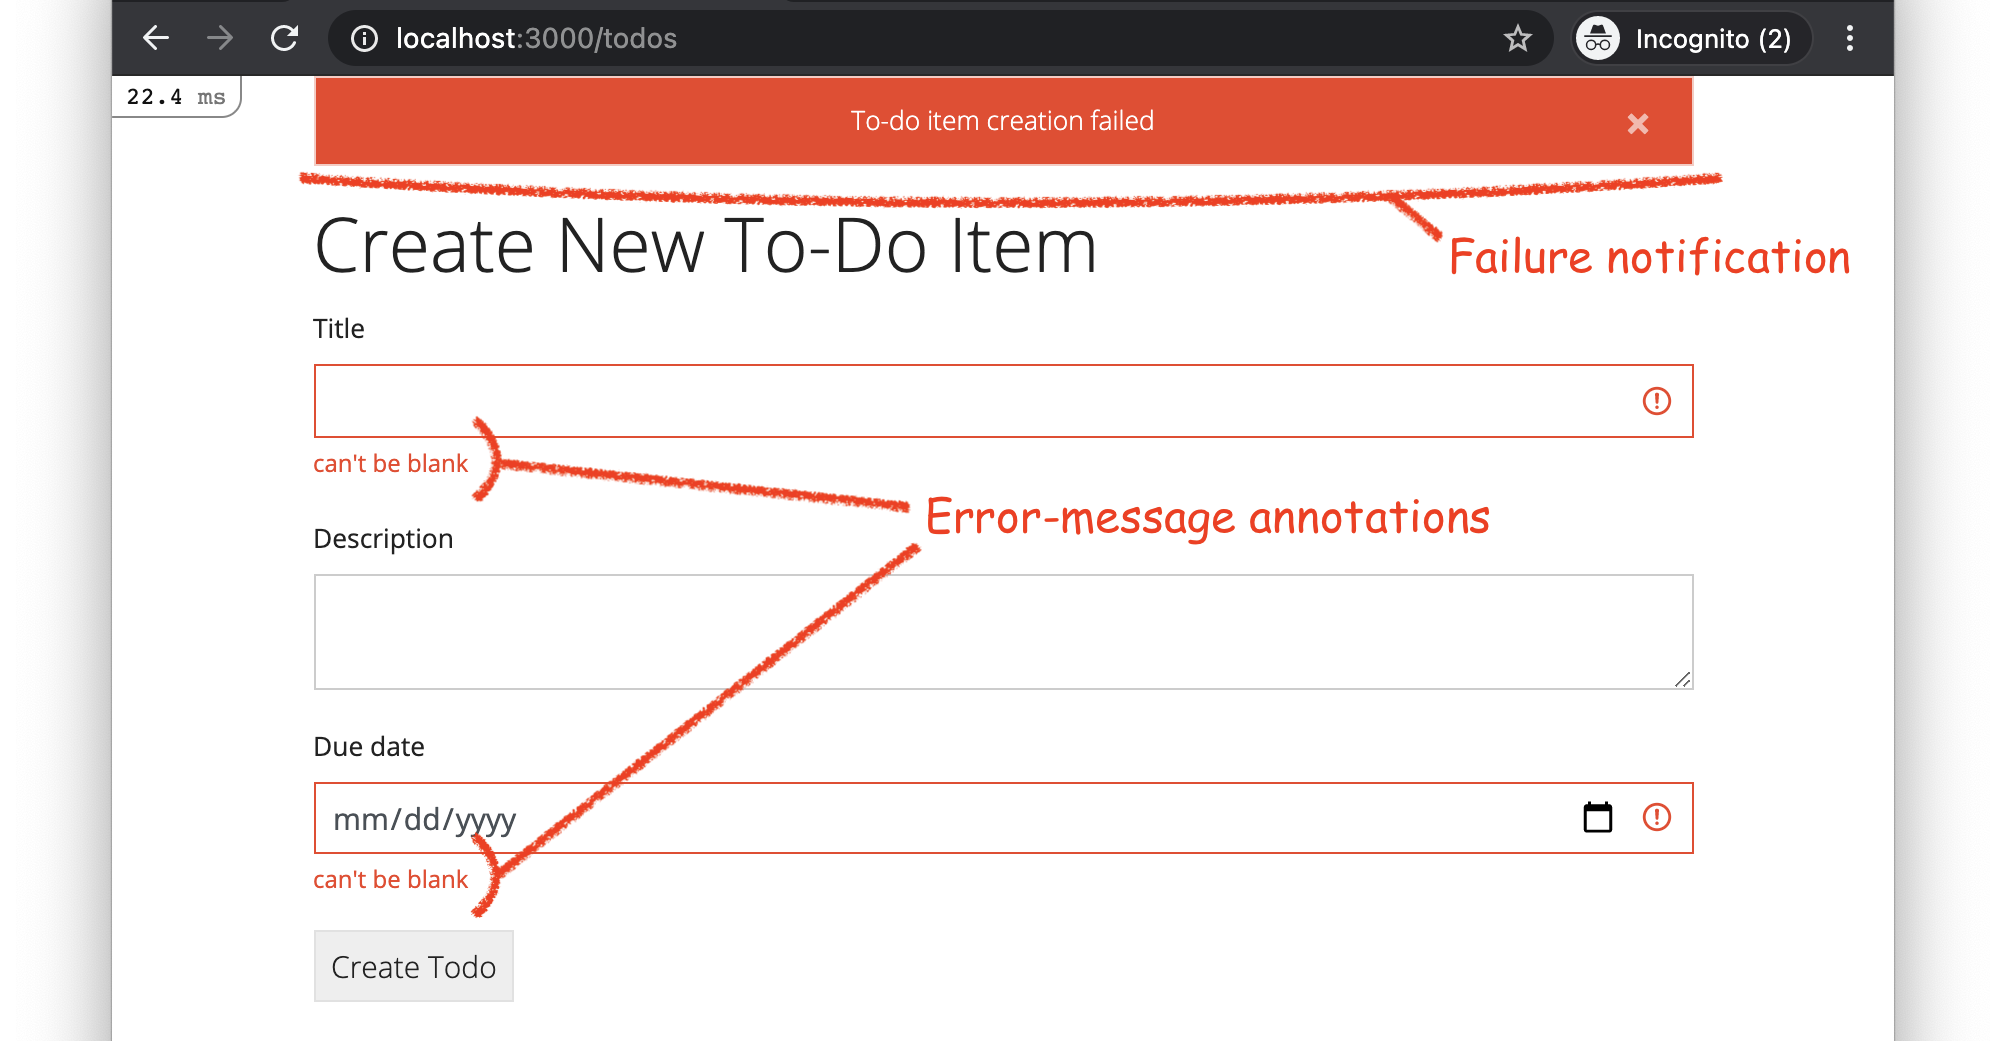
Figure 5. The new-resource page after an unsuccessful form submission. The page includes a failure notification at the top and error-message annotations on the form fields that contain invalid values.
Step 1 Add a New-Resource Route
To add a route for the new-resource page, we add a route declaration to the config/routes.rb file, like this:
Rails.application.routes.draw do

  root to: redirect('/todos')

  get 'todos', to: 'todos#index', as: 'todos'
  get 'todos/new', to: 'todos#new', as: 'new_todo'
  get 'todos/:id', to: 'todos#show', as: 'todo'

end
Note that this route matches HTTP GET requests with a resource path of todos/new (e.g., as in the URL http://localhost:3000/todos/new). As per the to: argument, the controller action to process such requests is TodosController#new. As per the as: argument, the path and URL helper methods for the new-resource page will be named new_todo_path and new_todo_url, respectively.
Important! The new-resource route declaration (get 'todos/new'…) must go before the show-resource route declaration (get 'todos/:id'… ) in the routes.rb file. The reason for this ordering constraint is that, when trying to match a request to a route, the Rails router will go through the routes starting with the first one declared and working downward. The first route to match will be the one applied. Note that the show-resource route (get 'todos/:id'…) route would match the same requests matched by the new-resource route (get 'todos/new'…) because the word new would be matched by the :id parameter in the show-resource route. Thus, it’s critical that new-resource route be declared first.
Test It!
To confirm that we made this change correctly, we run the following command in the terminal:
rails routes -E
The command should output a long list of routes, and the third one should look like this:
--[ Route 3 ]-------------------------------------------------------------------------------------------------------------------
Prefix            | new_todo
Verb              | GET
URI               | /todos/new(.:format)
Controller#Action | todos#new
If we made an error, something different will be outputted. For example, if we made a syntax error, it would instead produce an error message.
Step 2 Add a Model Controller (if Needed)
Because the base app already has a controller for Todo model objects, TodosController, we skip this step.
Step 3 Add a New-Resource Controller Action
To create the controller action for the new-resource page, we perform two substeps: first, we create the controller action code for rendering the view, and then, we add the code for creating an empty model object that will be used by the view form code.
Substep
Create a new-resource controller action that renders the appropriate view. To complete this substep, we define an new method in the TodosController class (in app/controllers/todos_controller.rb), like this:
class TodosController < ApplicationController

  def index
    @todos = Todo.order(:due_date)
    render :index
  end

  def show
    @todo = Todo.find(params[:id])
    render :show
  end

  def new
    render :new
  end

end
Note that, so far, the new controller action only renders the view template app/views/todos/new.html.erb (as specified by the :new symbol).
Substep
Make the controller action create an empty model object to be used by the view. To complete this substep, we add a call to the Todo.new constructor to the new method of the TodosController class, like this:
class TodosController < ApplicationController

  …

  def new
    @todo = Todo.new
    render :new
  end

end
Note that the call to Todo.new returns a Todo object with all its attribute values set to nil. Unlike the Todo.create class method, the Todo.new constructor does not save the object to the database. Recall that instance variables, like @todo, are accessible within view templates rendered by the class, thus allowing the empty Todo object to be passed from the controller to the view.
Test It!
To at least partially confirm that we made this change correctly, we run the web app (as per the steps in the running apps demo), and we open the URL http://localhost:3000/todos/new in our web browser. An error page should be displayed with the message “Template is missing”, because we have not yet created a view template for the new-resource page. If a different error message appears (e.g., a syntax error), then we made some other mistake, which we would want to fix before proceeding to the next step.
Step 4 Add a New-Resource View Template
To print the new-resource page, we first add the basic HTML skeleton for the page. Then, we fill in the basic logic for the form. Lastly, we add Bootstrap styling to the form.
Substep
Rough in the HTML skeleton. To complete this substep, we create a new view template file in the folder app/views/todos/ named new.html.erb, and we add an <h1> element to the file, like this:
<h1>Create New To-Do Item</h1>
Substep
Add the form helper to the view. As a first step toward creating the form, we add an embedded Ruby call to the form_with form helper method, like this:
<h1>Create New To-Do Item</h1>

<%= form_with model: @todo, url: todos_path, method: :post, local: true do |f| %>

<% end %>
The form_with method call takes several key arguments. The model: option tells the form helper that this form will be for a model class. Recall that the @todo instance variable was set to reference an empty Todo model object in the new controller action. Thus, by passing the argument model: @todo, the form helper can infer that the form will be used to create a Todo model object. Additionally, if a form submission is unsuccessful (e.g., due to a failed validation), this argument can be used to populate the form with the user-entered data, giving the user a convenient way to correct their mistake. The url: todos_path specifies that, when the form is submitted, the HTTP should be sent to same resource path as the index route (albeit with a different HTTP request verb). The method: :post argument specifies that, when the form is submitted, an HTTP POST request should be sent. The local: true argument specifies that Ajax (a JavaScript-based technology) should not be used to submit form-field data.
Note that the form_with method also takes a block as an argument (delimited by do |f| and end). The block will contain all the form fields, buttons, and other HTML within the form.
Substep Add the form-field helpers to the form. To add the fields to the form, we add embedded Ruby calls to Rails form-field helper methods, like this:
<h1>Create New To-Do Item</h1>

<%= form_with model: @todo, url: todos_path, method: :post, local: true do |f| %>

  <%= f.text_field :title %>
  <%= f.text_area :description %>
  <%= f.date_field :due_date %>
  <%= f.submit %>

<% end %>
In the above code, the f variable references a FormBuilder object that we use to create the form’s input fields and submit button. Depending on the type of attribute, different types of input fields are used. The f.text_field call generates a single-line text field, whereas the f.text_area generates a multi-line text field. The f.date_field call generates a fancy date selector widget. Finally, the f.submit call generates a button that, when clicked, submits the form data to the server.
If you were to run the server at this point, you would see that the form fields all appear on the new-resource page, but they lack labels and are poorly styled, as depicted in Figure 6.

Figure 6. An unlabeled and unstyled form for creating a new to-do item.
We could improve the appearance and usability of this form by adding HTML and CSS to correct the layout and by adding labels using embedded Ruby calls, like this:
<%= f.label :title %>
However, we will instead make use of the bootstrap_form gem to automatically generate these things.
Substep
Add Bootstrap labels and styling to the form. To complete this substep, we change the call to form_with to bootstrap_form_with from the bootstrap_form gem, like this:
<h1>Create New To-Do Item</h1>

<%= bootstrap_form_with model: @todo, url: todos_path, method: :post, local: true do |f| %>

  <%= f.text_field :title %>
  <%= f.text_area :description %>
  <%= f.date_field :due_date %>
  <%= f.submit %>

<% end %>
By switching to the bootstrap_form_with form helper, the form’s labels, layout, and styling should now appear as in Figure 1. Additionally, bootstrap_form_with also provides the error-message annotations applied to form fields submitted with invalid values (recall Figure 5).
Test It!
To verify that we completed this step correctly, we run the web app (as per the steps in the running apps demo), and we open the URL http://localhost:3000/todos/new in our web browser. The webpage displayed should look exactly like Figure 1. We should be able to enter data into each form field; however, pressing the “Create Todo” submit button will produce a “Routing Error” page because “No route matches [POST] “/todos””. We will add the logic for handling form submissions in the upcoming steps.
Step 5 Add Link(s) to the New-Resource Page (if Needed)
To make the form accessible to users of the app, we add a button that links to the form at the bottom of the index page. To complete this step, we will perform two substeps: (1) generating the link in the index view template and (2) styling the link to look like a button.
Substep
Add a link from the index page to the new-resource page. To complete this substep, we add to the app/views/todos/index.html.erb view template a <p> element containing an embedded-Ruby call to the link_to view helper, like this:
<h1>To-Do Items</h1>

<table class="table table-hover">

  …

</table>

<p>
  <%= link_to "Create New To-Do Item", new_todo_path %>
</p>
Substep
Style the link to look like a button. To complete this substep, we add an argument to the call to link_to that adds Bootstrap button CSS classes to the generated link, like this:
<p>
  <%= link_to "Create New To-Do Item", new_todo_path, class: 'btn btn-primary' %>
</p>
Test It!
To verify that we completed this step correctly, we run the web app (as per the steps in the running apps demo), and we open the URL http://localhost:3000/todos in our web browser. A button should now appear at the bottom of the index page that, when clicked, opens the new-resource page.
Step 6 Add a Create-Resource Route
To add a route for the create-resource controller action that will handle the HTTP POST requests generated when users submit the form, we add a post route declaration to the config/routes.rb file, like this:
Rails.application.routes.draw do

  root to: redirect('/todos')

  get 'todos', to: 'todos#index', as: 'todos'
  post 'todos', to: 'todos#create'
  get 'todos/new', to: 'todos#new', as: 'new_todo'
  get 'todos/:id', to: 'todos#show', as: 'todo'

end
Note that the post 'todos' part of this route corresponds to how we earlier called the bootstrap_form_with method. In particular, we set the method: post and the url: todos_path options, which control the HTTP request that the browser sends when a user clicks the form’s submit button. In particular, these option imply that the browser will send an HTTP POST request with the resource path /todos.
Also, note that this route does not have an as: argument, because the index route already set one for this resource path ('todos'); thus, we can use the todos_path and todos_url helper methods in relation to either of these get and post routes.
Test It!
To verify that we completed this step correctly, we run the web app (as per the steps in the running apps demo); we open the URL http://localhost:3000/todos/new in our web browser; and we press the “Create Todo” submit button. An “Unknown action” error page should be displayed because “The action ‘create’ could not be found for TodosController”. This message indicates that our post route was matched, but there is no TodosController#create method, which we will define in the next step.
Step 7 Add a Create-Resource Controller Action
To create the controller action for handling from submissions from the new-resource page, we perform three substeps: (1) create an empty create-resource controller action, (2) add code to the action that creates a new model object based on the submitted form data, and (3) add code to the action that saves the model object, responding to the browser with an HTTP redirect on success and re-rendering the form if saving fails.
Substep
Create an empty create-resource controller action. To complete this substep, we define an create method in the TodosController class (in app/controllers/todos_controller.rb), like this:
class TodosController < ApplicationController

  def index
    @todos = Todo.order(:due_date)
    render :index
  end

  def show
    @todo = Todo.find(params[:id])
    render :show
  end

  def new
    @todo = Todo.new
    render :new
  end

  def create

  end

end
Substep
Create and initialize a new model object based on the form data submitted. To complete this substep, we add to the create method a call to the Todo.new constructor, like this:
class TodosController < ApplicationController

  …

  def create
    @todo = Todo.new(params.require(:todo).permit(:title, :description, :due_date))
  end

end
This long line of code requires some explanation, so let’s unpack it. The Todo.new call allocates and returns a new Todo model object, but it doesn’t save the new object to the database. The @todo variable is set to reference the object, so we can access is in subsequent code. Recall from the show pages demo that params is a method (that can be used like a hash) to access to all the data from the HTTP request to be handled by the controller action.
To understand the above call, params.require(:todo), one must understand something about how the params hash is structured. When using the form_with (or bootstrap_form_with) form helper as we did above, the submitted form data will be encoded in the params hash in the manner shown in this example:
{
  "todo" => {
    "title" => "Water the garden",
    "description" => "Don't forget to water the azaleas!",
    "due_date" => "2021-05-08"
  }
}
Note that the params hash has a top-level key, "todo", which is a snake_case version of the model class name, Todo, and comes from the model: @todo argument to the form_with (or bootstrap_form_with) call. This top-level key maps to a hash containing the user-entered form data. Each key in this inner hash is an attribute name and maps to the value entered into the form by the user.
The call to require(:todo) is used to help secure the app against malicious data. It basically says that the hash must have a top-level key, "todo". If the hash does have such a key, the method returns the value (a hash in this case) to which that key maps. If the hash does not have such a key, the method returns false, effectively preventing any further processing of the request.
The call to permit(:title, :description, :due_date) that is applied to the hash returned by require(:todo) similarly serves a security purpose. This call returns a filtered version of the hash that contains only the keys (and their associated values) that are listed as arguments to the call. Thus, any extraneous (and possibly malicious) key/value pairs that were included in the request are discarded and rendered harmless.
After evaluating the params-require-permit call chain, the call to Todo.new receives as its argument a hash that contains only keys that match the Todo class attributes, with each of those keys mapping to the value entered by the user into the form.
Substep
Save the model object, handling both success and failure conditions. To complete this step, we first add to the create action a call to the save method wrapped in an if/else statement, like this:
class TodosController < ApplicationController

  …

  def create
    @todo = Todo.new(params.require(:todo).permit(:title, :description, :due_date))
    if @todo.save

    else

    end
  end

end
The call to save returns true on success and false if the save operation failed. Thus, the body of the if part of the if/else statement will run if the call to save succeeds, and the body of the else part will run if the call to save fails. For example, the call to save would fail if any of the @todo object’s attribute values violated a validation declared in the Todo class.
Next, we set the behavior after a successful save, like this:
class TodosController < ApplicationController

  …

  def create
    @todo = Todo.new(params.require(:todo).permit(:title, :description, :due_date))
    if @todo.save
      flash[:success] = "New to-do item successfully added!"
      redirect_to todos_url
    else

    end
  end

end
The call to redirect_to causes the web server to reply to the browser with an HTTP redirect response. In particular, the call, redirect_to todos_url, tells the browser to make a new HTTP GET request to the URL of the app’s index page. The flash[:success] line above that assigns a message string to the flash hash will cause a flash success notification to appear on the index page when the browser displays it. (See the flash notifications deets for a full explanation of how this works.)
Lastly, we set the behavior for an unsuccessful save, like this:
class TodosController < ApplicationController

  …

  def create
    @todo = Todo.new(params.require(:todo).permit(:title, :description, :due_date))
    if @todo.save
      flash[:success] = "New to-do item successfully added!"
      redirect_to todos_url
    else
      flash.now[:error] = "To-do item creation failed"
      render :new
    end
  end

end
Instead of replying to the browser with an HTTP redirect, like we did for the success case, we re-render the new-resource page, giving the user a chance to correct the invalid form data they entered. Note that, in this case, we use flash.now to set the flash notification, because the notification must be included in the current HTTP response to be sent to the browser (and not the next response, as in the case of an HTTP redirect). An interesting thing about the call to render in this case is that @todo object, which contains the form data entered by the user, will be used by the call to bootstrap_form_with when rendering the new-resource page to pre-populate the form with the data previously submitted by the user. This behavior saves the user from having to re-enter all the form data from scratch, and it enables the bootstrap_form_with helper to add error-message annotations to the form fields containing invalid data.
Test It!
To verify that we completed this step correctly, we run the web app (as per the steps in the running apps demo). We open the URL http://localhost:3000/todos/new in our web browser, fill out the form with valid data, and we click the “Create Todo” submit button. The browser should be redirected to the index page (http://localhost:3000/todos), and the newly created to-do item should appear in the table. A success notification should also appear at the top of the index page.
To verify the form’s error-handling behavior, we follow the link back to the new-resource page (http://localhost:3000/todos/new), and we click the “Create Todo” submit button without entering any data into the form. This time, the form should be redisplayed with an error notification at the top and error-message annotations on the invalid form fields.
Conclusion
Following the above steps, we have now made a new/create form for saving to the database new instances of an existing model class.